Kerb Preparation Tips
Cutting a Trench
When re-laying kerbing along an existing road, it is often necessary to saw-cut the road edge and dig a trench for the kerb to sit in. The question often arises, “how wide should the trench be?”, or more to the point, “where should I saw-cut the road?”.
Generally, the key is, not to think of a particular distance from the road edge of the proposed kerb and gutter (channel), but a distance from the road edge of the kerb machine. This is because, even though kerb widths vary, kerb machines widths don’t.
For example. An Arrow 770 kerb machine, is, as the name suggests, 770mm wide. Kerbs that the Arrow 770 can lay vary from 120mm wide to 710mm wide, and even more if the machine is modified.
So if your kerb contractor uses an Arrow 770, and you want to lay an average NSW Kerb and Gutter, that 770mm wide machine will be sporting a 620mm wide Kerb mould. So in this instance, the front lip of gutter (channel), is stepped in about 150mm from the road edge of the kerb machine.
![]()
If the length of kerb is straight, a saw-cut distance of 300mm in front of the machine is fine. So in the example we’ve mentioned, you’d want to saw-cut the road 450mm (300mm + 150mm) from where you want your gutter lip to be.
And yes, the narrower the kerb profile, the WIDER the distance needs to be from the saw-cut to the road edge of the new kerb. In the extreme case, an Arrow 770 laying a 120mm wide kerb-only would need about 900mm from the road face of the kerb to the saw cut!
At Vadas Kerb though, we have made things a bit easier. We have customised machines that generally only need 200mm (or less) from the road edge of your proposed kerb to your saw-cut. (See picture below). If you need this clarified further, please call James on 0456 789 000.
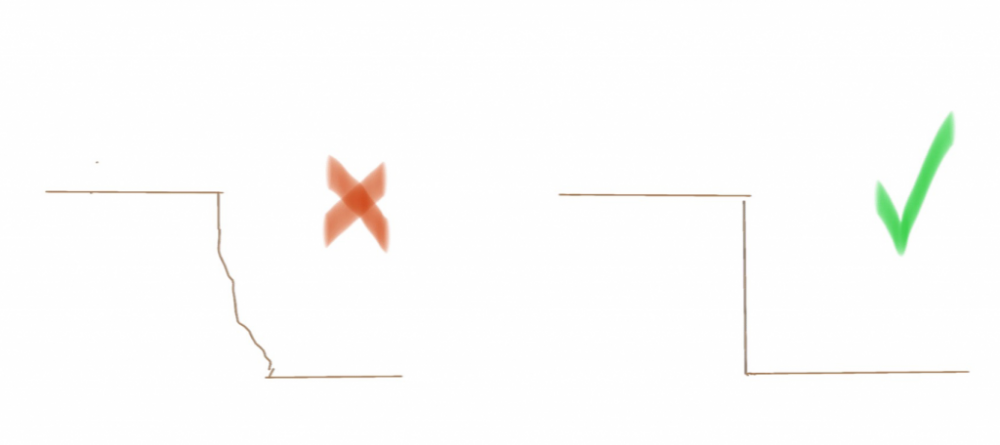
Tip 1: The 300mm distance mentioned can be brought in to 150mm, or even 100mm IF the length of kerb is a straight line, the saw-cut is super straight, AND that the road edge of the trench is trimmed absolutely vertical. There cannot be any “rounding” of the bottom edge of the cut.
Tip 2: As mentioned, the measurements ONLY apply to straight sections of kerb. If the kerb trench turns a radius (corner) the distance of the saw-cut needed increases dramatically. This is because the front, road-side of the kerb machine needs to run wide in order for the kerb at the rear of the machine to be in the correct position. For example: If driving an external radius (corner) of 8m, the distance from the saw cut to the front of gutter needs to increase from 300mm to around 800mm as it rounds the corner.
Concrete Kerb-Mix. How important is quality?
Very important. It can be the difference between a good and bad end result.
Some common problems with kerb mixes are:
Poor slump control: Too dry, too wet. Kerb mix is sometimes delivered so dry that it looks ‘dusty’! It can then take 200 litres or more of water to get it to the correct slump!.
Balling: The load containing cement ‘balls’, are sometimes bigger than tennis balls. These balls are almost pure cement, which has been robbed from the overall cement content of the load. The balls also promote random weak spots and cracking in kerb. They are formed when the concrete batcher doesn’t add enough water as the first ingredient of batching concrete.
Premature Setting of Concrete: This happens when the concrete batcher fails to use retardant, or doesn’t use enough retardant for hot and/or windy conditions.
It is very common for concrete companies to skimp on the dose rates of their retarder. This either through fear of over-dosing the concrete (very unlikely), or saving on their costs.
A kerb contractor will struggle and the kerb job will look unsightly if they are contending with quick-setting concrete.The importance of adequate retardant cannot be overstated.
Ideally, a concrete company will use a dedicated retardant, as opposed to a combination water-reducer / retardant. Some companies use Daramene-R from Grace Chemicals. The dose rates for summer should be no less than 500ml per 100kg of cement.
Installing Kerb Survey Pegs
To lay an accurate kerb, you need survey.
Survey can be supplied to your kerb contractor using roofing nails with ribbons in the base, or by using survey pegs.
Carefully installed survey pegs are ideal as they are easy to see and use. Also, nails in the gravel base often get disturbed or covered over by the kerb machine. This makes it difficult to do spot checks on the kerb after the kerb and gutter contractor has taken his string-line pegs out.
Ideally, the surveyor should install his offset pegs at 250mm (instead of 1m) behind the back of the kerb, with top-of-kerb marked on the pegs.
This allows your kerbing contractor to string his line directly onto the pegs, avoiding doubling up on installing pegs. We offer a discount if the survey pegs are set at a 250mm offset, and you’d be wise to ask your kerb contractor if he would do the same.
Pouring kerb on a raised platform, or kerb track
Sometimes, there may be a need to pour kerb on a raised platform, otherwise known as a “kerb track”.
[Diagram]
While this may seem necessary, it is best avoided. Why?
Simply put, when the kerb machine is higher than the concrete truck, the concrete won’t run down the chute properly. While this can be accommodated for a short run of, say 30m, to prepare hundreds of metres this way is problematic. It usually means that the kerb machine will need its concrete fed to it with an excavator, costing a lot in hire and it still usually results in slower pouring.
If you are laying deep lift asphalt, or heavily bound pavement, it is far better to put as many layers in as possible, and then trim up a trench and pour the kerb in the trench. This ensures an easy discharge of concrete into the kerb machine.
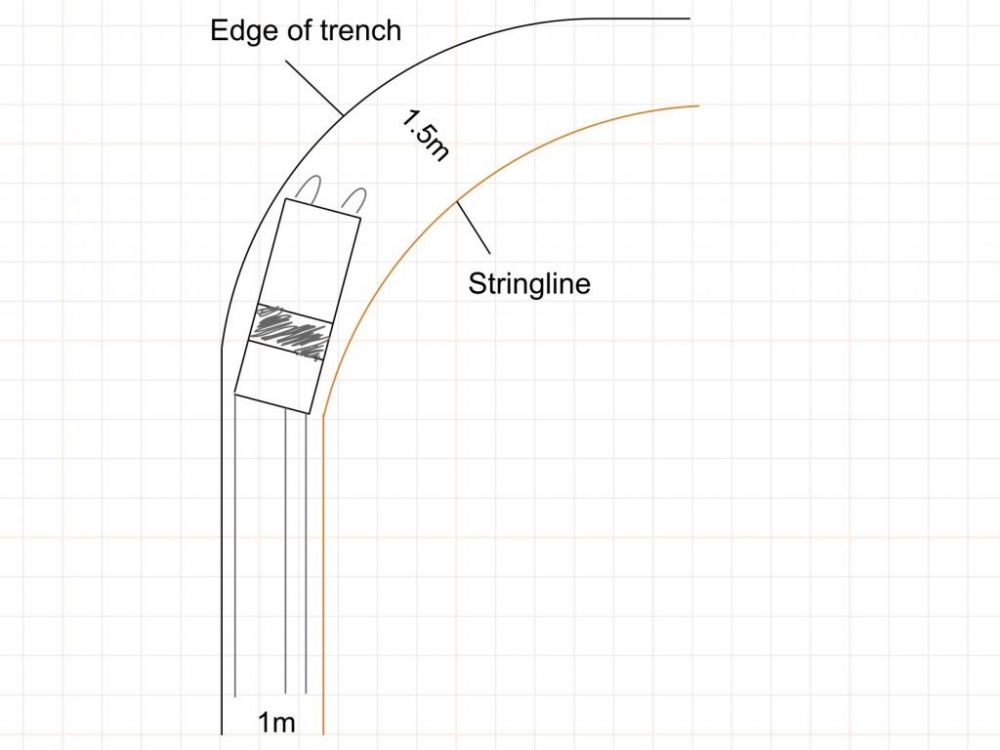
Preparing an internal corner for the kerb machine.
Internal corners, often found in car parks, need to be prepared in a way that allows the kerb machine to drive past the corner, allowing it to shorten the gap, and the amount of hand formed kerb needed.
A “runout”, a level, firm base of 1.5 to 2m past the corner is ideal, although it sometimes isn’t possible, such as when the corner is close to a wall or has shallow pipes and services in the area.
Which direction does the runout need to be? It is always the area where the kerb machine drives INTO the corner, not AWAY from it. Kerb machines almost always run “against the traffic”. So in a carpark situation, a machine will drive around the carpark in an anti-clockwise direction.
[Diagram: Good]
[Diagram: Bad]
Preparing kerb for a cambered road (crossfall)
Care must be taken when trimming road base for kerb on a cambered road, or a road with significant crossfall.
It must be remembered that while the bottom of a kerb machine sits level, the road may have a crossfall.
While it’s ok to have a certain amount of crossfall below a kerb machine, the point from where the base height is measured is critical.
Often, a survey peg containing the road is 500mm to 1m behind the kerb. If the centre of the road is higher than the kerb, care must be taken to make sure that the road level indicated on the survey peg is transferred a good 1.5m from the peg, towards the centre of the road. This will ensure sufficient depth below the kerb machine on the road side.
Setting Kerb Lintels: Before or After Laying the Kerb?
We occasionally get asked: I’ve already got the lintels here, should I put them in before you come to lay the kerb? The short answer is, no.
It may be tempting, thinking you can keep your team busy until the kerb contractor arrives, but in reality it is creating much more work for the kerb contractor, costing you more, and you will likely end up with an inferior result.
In the preferable situation, the pit boxes are covered with a steel or wood ply plate. The kerb crew lays the kerb over the covered pit hole. The concrete from the kerb over the pit is then removed and either dumped, or re-used though the kerb machine, used to set the kerb lintel straight away, or used elsewhere on the job. The gap left in the kerb is wide enough to allow the lintel to be set.
The advantages of setting lintels after laying the kerb is that it allows the kerb crew to continue without interruption, avoids loads of handwork, and it also results in a better looking job. Reason being that it is always better to set a lintel between 2 existing pieces of kerb, than to try and measure and estimate where the lintel should go. It results in the lintels being level and on line.